Accuracy Unraveled
We can buy sensors to measure just about anything, and each of those sensors has an almost endless list of specifications that tell us how we can expect it to perform. Accuracy is the most often referred to specification to prove the worthiness of a particular sensor. In the real world a sensor will never reflect the actual conditions exactly, but a quality sensor can provide us with information that falls within a maximum stated error. This maximum stated error is called accuracy, and accuracy as a specification is almost never used without some kind of qualifying factor such as “includes non-linearity and hysteresis.” Accuracy can be expressed as a percent of full scale or as an absolute number. Since there is no universal way to express accuracy, it becomes important that we understand it and its implications. Unraveling the shrouded mystery of accuracy begins with understanding the language and how accuracy is determined.
There are many ways to describe the behavior of a particular sensing device. We may see terminology such as thermal effect, compensated ranges, full scale, and temperature effects. All of these terms relate how closely a sensor will reflect actual conditions. However, when we talk about accuracy we are generally talking about non-linearity, hysteresis, and repeatability. Each of these components of accuracy is determined by various methods and the sum of non-linearity, hysteresis, repeatability, and offset gives us a full picture of accuracy
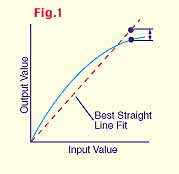
Non-linearity makes up the bulk of sensor inaccuracies. It can be described as the maximum difference between the measured data and the data as approximated by a best straight-line equation of the recorded data. It is generally expressed as a percentage of full scale (See Figure 1). Full scale is the entire range of the sensing device. For example, a manufacturer may indicate that his sensing device has a non-linearity of ±0.5%. If we use an example of a pressure transmitter that has a range of 0 to 100 psi, then the full scale of that pressure transmitter would be100 psi. The maximum error at any measured point from actual conditions will be no more than ±0.5 psi. So considering non-linearity only, we can say that this device has an accuracy of ±0.5% FS (full scale) or a maximum error of 0.5 psi at any point in the 0 to 100 psi range.

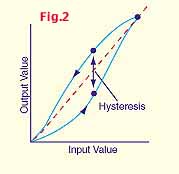
Hysteresis describes the maximum difference, as a percentage of full scale, between the data points in a ramping from zero to full scale and back to zero again (See Figure 2). If the manufacturer tells us that the maximum error due to hysteresis is+/- 0.15% FS then, using the pressure transmitter in the above example, the maximum difference at any point within the 0 to 100 psi range is ±0.15 psi. Our accuracy picture is now a little more complete. Combining non-linearity and hysteresis our sample pressure transmitter has an accuracy of +/- 0.65% FS.

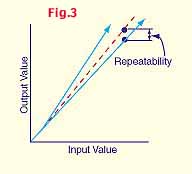
Repeatability is similar to hysteresis with the exception that we are now measuring the maximum difference in data points when the device is ramped multiple times in the same direction (See Figure 3). If we are told that the repeatability of our pressure transmitter is ±0.35% of FS, we can put together a complete picture of accuracy. The defined accuracy of our pressure transmitter is the combination of non-linearity, hysteresis, and repeatability. In our case this sample pressure product would have an accuracy (due to non-linearity, hysteresis, and repeatability) of ±1.0% FS.

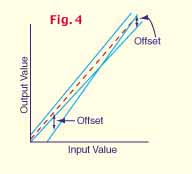
Offset is also known as interchangeability, static error, or tolerance. It can be an inaccuracy significant in physical sensors (like temperature sensors) but generally insignificant in electrically driven devices (like humidity and pressure transmitters). Offset is the amount of difference between the actual condition and the sensed condition in physical sensors before any signal conditioning. For example, you won’t see a statement in a pressure transmitter specification for offset. Although the physical device that senses the change in pressure, such as a strain gauge, will have an offset, that offset is compensated for and virtually eliminated during the calibration process of the pressure transmitter. On the other hand, a PreCon Thermistor offered by Kele promises to be accurate at 77 °F to within +/- 0.36°F. That +/- 0.36°F @ 77°F is the offset. The offset can occur with an accurate zero point and full scale span shift, or the full scale span may be accurate but the zero point may be shifted from the actual zero point. The offset may also occur as a linear shift throughout the entire span.
(See Fig. 4).

In our example using a pressure transmitter, we can assume that the offset of the raw sensor itself has become insignificant and determine that the device itself has an accuracy of +/- 1.0% FS. The maximum error at any point along the 0 to 100 psi range is +/- 1.0 psi. A basic understanding of accuracy and how it is determined can provide us with some insight as to how a specific transmitter will perform. However, even the most accurate device can be affected by outside influences. For example, temperature changes may cause a shift in the zero point or span. Vibration, location, age, wire type, power condition, and electronic noise can all affect the operation of a transmitter and even make the most accurate device give inaccurate readings. So when troubleshooting a seemingly inaccurate device, consider the outside effects due to installed conditions as well.


